If you have access to SSH on a remote server (dedicated server, vps or shell account), you can browse the internet over the IP address hiding your original IP address.
This can be useful for many scenarios like –
IP based authentication over dynamic IP:
In many cases for security reasons we use restrict access only to some selected IP addresses. For example, admin area of a blog, forum, billing system or help desk can be protected with IP based authentication.
But what if you are on dynamic IP? You can allow your users (or yourself) first to ssh to a server with static ip and then access your restricted web app over the ssh tunnel. Your restricted web app will get the remote server IP as the user IP.
Technical limitations related to shared/dynamic IP:
In many places (specially in Bangladesh) ISPs provide the clients only with dynamic or shared IP address. In some places access are limited by number of access per IP address.
For example, download services like RapidShare will not allow you to download a file when someone else is downloading a file over your shared IP. You can easily bypass such limits using this SSH Tunneling.
Just last night I had to use ssh tunneling to create a couple of Live IDs (passport.net) as Micro$oft was not allowing to create any from my local ISP IP :S
Being a cool geek:
Or you can use it just to surprise your friends (who actaully checks for your ip =P) by showing your domain on you email and forum posts ;)
Anyways… enough of possible “usage”. If you are reading this, I bet you already “need it” =P
Now to get straight into the tutorial.
What you need?
1. PuTTY SSH Client. (Can be downloaded from here.)
2. Firefox Web Browser. (Can be downloaded from here.)
3. SSH access to a unix/linux server. (Now thats something I can’t give you ;) )
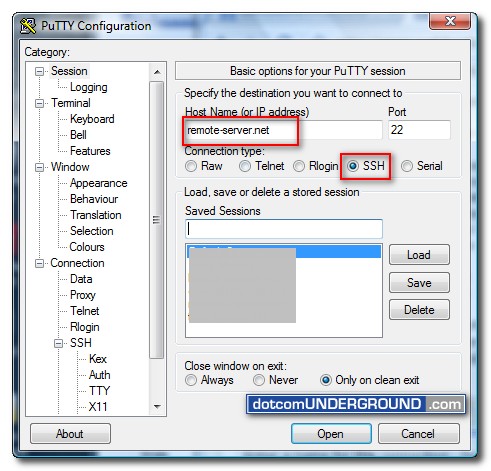
Now, first run PuTTY. You should be on the “PuTTY Configuration” window. On the “Host Name (or IP address)” field, type the hostname or IP address of your remote server. And select “Connection type” as “SSH“. The port should get automatically selected to 22.
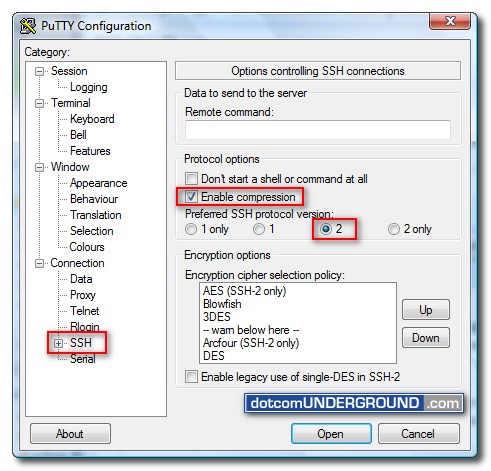
Then, in the left-hand menu, click on “SSH“. In “Protocol options“, tick “enable compression” and set your preferred SSH version to “2“.
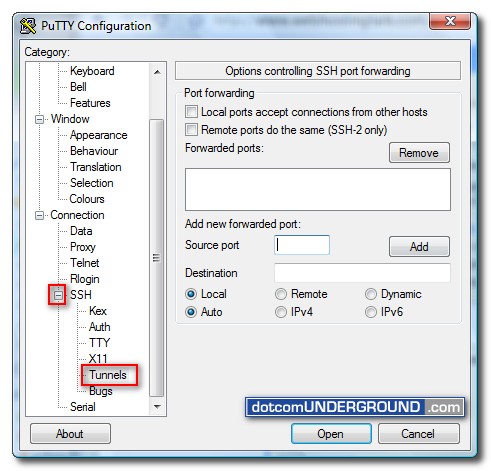
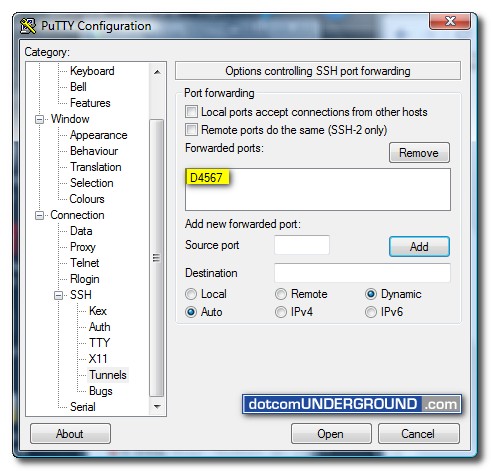
Now expand the “SSH” menu and select the “Tunnels” sub-menu.
Now under the “Tunnels” menu (Options controlling SSH port forwarding), in the “Source port” field, type in a source port. Here I am using 4567. But you can use anything. Then select “Dynamic” as “Destination” and click the “Add” button.
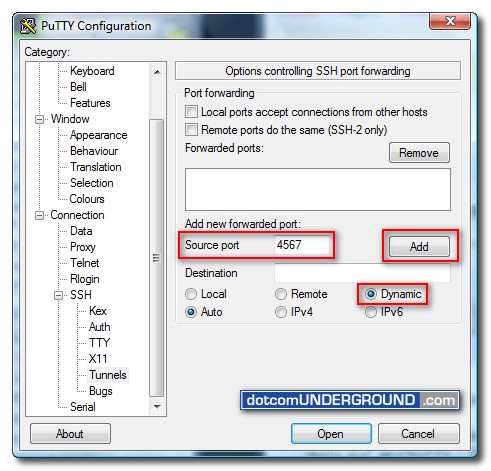
After clicking the “Add” button the newly added forwarded port should get listed under “Forwarded ports” list.
Now, go back to the “Session” tab at the top of the menu, give the new connection a name (here i used My SSH Proxy) and click on the “Save” button.
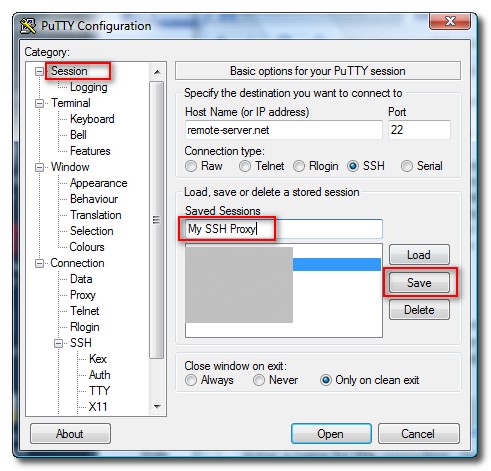
Congrats! we are done with the PuTTY configuration.
From now on you can use this connection to login to your server. After login, you winn be able to use the connection as SSH Tunnel.
But before starting to browse internet using the IP address of the server, we need to configure firefox settings.
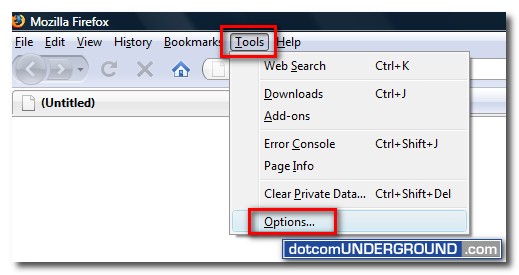
Lets fire up the fox and go to “Tools > Options…”
Now click the Advanced icon (on the upper-right of the dialog), and select the Network tab. Then click on the “Settings…” button.
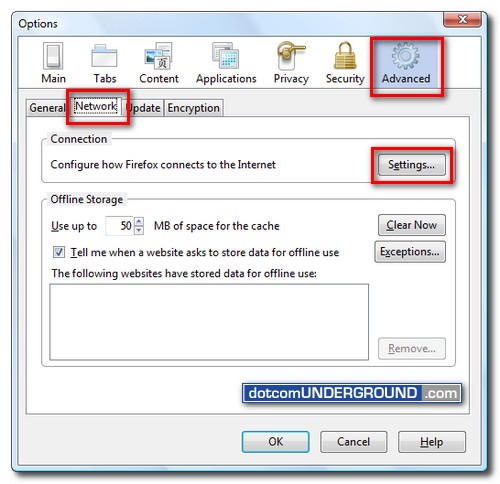
This will brings up the “Connection Settings” dialog. On this dialog click the “Manual proxy configuration” radio button, then put the address 127.0.0.1 in the “SOCKS Host” field. In the “Port” field enter the port you used when configuring your SSH tunnel with Putty. In my case this port is 4567.
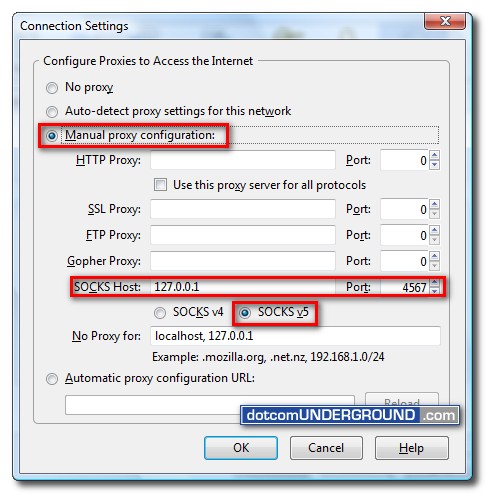
Click the “OK” buttons to accept your changes.
Done!
Now make sure you have already logged in to the server using the connection we created with PuTTY and start browsing with Firefox.
You can visit a IP address identifier site like WhatIsYourIp.com or Whois.com.bd to check which IP address firefox is showing.
If you do not already have access to a linux server or shell account, you can grab a high performance vps from evolution-host.com
Tags: Firefox, Linux, Proxy, PuTTY, SOCKS Proxy, Unix
Categories: Tech, Tips and Tricks, Tutorials
